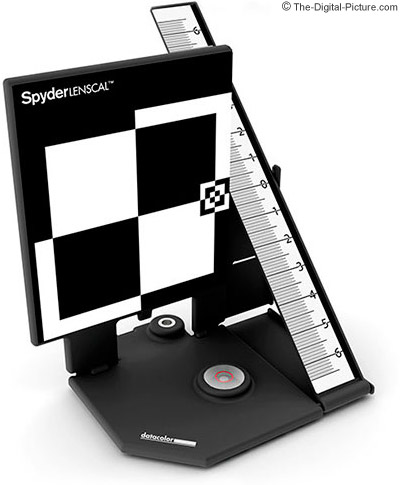
Regular readers of this blog will remember that, as an archetypal (i.e. anally retentive) engineer, I like to ensure that all the equipment I use is properly calibrated. This was driven home to me forcibly when I started to get focus problems in the middle of nowhere. In an attempt to knock the problem on the head, I acquired a Spyder LensCal and decided to do the job properly. Needless to say the LensCal tool was significantly less easy to use than I'd hoped, with much of it being down to the difficulty of ensuring that the device and the sensor were parallel.
I've always liked Keith Cooper's Northlight Images site, and happened to come across an article called Camera AF Microadjustment - for free. Being a dyed-in-the-wool Yorkshireman - and a frustrated lens calibrator - it was obviously worth a look.
Cutting a long story short, the technique relies on the fact that digital cameras take discrete samples (i.e. pixels). A side effect of sampling is that capturing detail of a similar resolution to the camera's sensor will result in aliasing artefacts - often visible as Moire Patterns. Checking focus is simplicity itself: display an image with very fine detail on a monitor, and attempt to focus on it with a camera. Then adjust the focus calibration until the visibility of the Moire Pattern is maximised. Unlike other techniques, spotting the critical focus position is very easy; and, by moving the focus ring manually after auto-focus, it's possible to determine whether the camera is front- or back-focusing. Keith gives a link to download a suitable pattern file on his site, but in case this doesn't work I've put a copy here.
The setup I used was to link my laptop to a full-HD television using HDMI (the Moire image is 1000px square, so almost fills the screen). As Keith explains, it is essential that the image is displayed at 1:1 resolution (I used Photoshop in "full screen" mode) as any scaling will introduce its own artefacts.
Using a television rather than a monitor has the advantage of being: (a) large; and (b) vertical. I found that positioning the camera so that it was properly aligned was actually pretty straightforward. This is partly because the rectangular frame of the TV was easy to align in the viewfinder, but also any misalignment was instantly visible since different parts of the image would "snap" into focus at different times.
Because of problems with scaling and sampling, the two images below may or may not show the effect I'm trying to demonstrate. The first image is exactly in focus, with lots of interference patterns being visible. The second image is very slightly out of focus, and the interference patterns - although present - are less distinct.
I went through my set of lenses, noticing that - while a few of them agreed with the LensCal results - many were significantly different. The proof of the pudding was in the eating, though, and I tested all the lenses with their new calibration settings. Each one was absolutely spot on having used the Moire method, which I guess is the clincher.
Here are two examples showing the full frame and then a 100% crop from two of the lenses whose calibration data changed significantly. The first example uses the EF 50/1.8 mk1 and the second uses the EF 85/1.8 USM. Both are shot at f/1.8.
While it's slightly worrying that the calibration data changed so much (the 85 went from -2 to -8, and the 50 went from +14 to -6!), I now have significantly more confidence that my lenses are set up correctly than I did before.
It's well worth reading Keith's article, and I'd be very interested to hear from anyone else who has tried the technique. Not only is it free, but it actually seems to work!
Random postings from an itinerant engineer who would rather be taking pictures or catching trout on the fly...
Showing posts with label Lens Calibration. Show all posts
Tuesday, 9 December 2014
Friday, 27 June 2014
Lens Calibration (the proper way)
Readers of this blog might remember that I had focus problems in Iceland as a result of buying new equipment immediately before going on holiday. Keen not to repeat the same mistake two years in a row I decided to splash out on a Spyder LensCal. A simple piece of kit, which in principle should be simple to use.
That's the theory, anyway. The device comes with a 1/4" mounting, so it's easy to fix it to a tripod. That's the good news. What's not quite so good is that the spirit level isn't accurate; and, more importantly, the focusing centre of the target is not directly above the mounting point. This makes it very difficult to ensure that the camera and the LensCal target are parallel: this is crucial, as any rotation will invalidate the calibration results.
In the end I decided to think laterally (literally!) and put the LensCal on a focusing rail mounted sideways. This allowed me to shift the target until the centre was directly above the tripod column, thereby making alignment much easier. Even so there was no clear way to ensure that the target and the sensor planes were parallel other than by eye. Another minor flaw in the target which I bought related to the alignment of the focus target and the diagonal "ruler". The whole point of the system is that the "0" line is in exactly the same plane as the focus target. On my LensCal this wasn't true, so I had to pad the ruler support slightly in order to make everything exact. Being an anally-retentive engineer can be a bit of a pain sometimes...
I tried checking the focus calibration on the back screen of the camera, but this proved to be quite tricky - especially with the slower lenses. As is shown in the picture above, the easy solution was to tether the camera to a laptop running Lightroom as this allowed me to view each captured image at 100% or 200% in order to check focus accuracy.
This is what the target should look like when set up properly. The camera focuses on the central square, and the diagonal ruler indicates whether the auto-focus system is front- or back-focusing.
Zooming in, this is what the target looks like if the lens is front-focusing. It's clear that the ruler in front of the target is in sharper focus compared to behind it. A quick positive correction to the camera calibration fixes this immediately.
The same image with micro-focus adjustment applied. It is easy to fall into the trap of checking the two "1" values and ensuring that they are equally soft. Because of the laws of physics, the area of good focus extends further behind the focal plane than it does in front of it, meaning that the area behind the "0" line will tend to appear sharper than that in front.
#Spyder #LensCal
That's the theory, anyway. The device comes with a 1/4" mounting, so it's easy to fix it to a tripod. That's the good news. What's not quite so good is that the spirit level isn't accurate; and, more importantly, the focusing centre of the target is not directly above the mounting point. This makes it very difficult to ensure that the camera and the LensCal target are parallel: this is crucial, as any rotation will invalidate the calibration results.
In the end I decided to think laterally (literally!) and put the LensCal on a focusing rail mounted sideways. This allowed me to shift the target until the centre was directly above the tripod column, thereby making alignment much easier. Even so there was no clear way to ensure that the target and the sensor planes were parallel other than by eye. Another minor flaw in the target which I bought related to the alignment of the focus target and the diagonal "ruler". The whole point of the system is that the "0" line is in exactly the same plane as the focus target. On my LensCal this wasn't true, so I had to pad the ruler support slightly in order to make everything exact. Being an anally-retentive engineer can be a bit of a pain sometimes...
I tried checking the focus calibration on the back screen of the camera, but this proved to be quite tricky - especially with the slower lenses. As is shown in the picture above, the easy solution was to tether the camera to a laptop running Lightroom as this allowed me to view each captured image at 100% or 200% in order to check focus accuracy.
This is what the target should look like when set up properly. The camera focuses on the central square, and the diagonal ruler indicates whether the auto-focus system is front- or back-focusing.
Zooming in, this is what the target looks like if the lens is front-focusing. It's clear that the ruler in front of the target is in sharper focus compared to behind it. A quick positive correction to the camera calibration fixes this immediately.
The same image with micro-focus adjustment applied. It is easy to fall into the trap of checking the two "1" values and ensuring that they are equally soft. Because of the laws of physics, the area of good focus extends further behind the focal plane than it does in front of it, meaning that the area behind the "0" line will tend to appear sharper than that in front.
#Spyder #LensCal
Labels:
Lens Calibration,
LensCal,
Spyder,
Tethered
Location:
Harston, Cambridge, Cambridgeshire, UK
Sunday, 18 May 2014
Focus Problems in the Middle of Nowhere
As promised, I thought I'd post a short technical interlude for those who are interested. I made the classic mistake of buying a piece of photographic equipment immediately before the trip (a Canon 1.4x mkIII teleconverter) and failing to check things out before leaving home. The converter has the reputation of being very sharp, and I knew the lens I fitted it to (Canon 70-200/2.8L IS mkII) was blisteringly sharp. The first half of the trip around Iceland delivered the occasional good shot from the combination, but an awful lot which were soft. Initially I assumed that it must be my technique, so (being an engineer) I tried lots of combinations of shutter speed, aperture, tripod, hand-held, with IS, without IS etc. The experiments demonstrated something very clearly: it wasn't my technique which was at fault, but that the lens was front-focusing (i.e. focusing on a point in front of the nominal subject). For example, here is a Tern on a rock (the best place for it, because when in the air it spent the entire time dive-bombing me!).
Not a great picture of the bird as the eye is in shadow, but the problem is clearly visible. The bird is slightly soft, and the rock about 6-8 inches in front of the bird is bitingly sharp.
Oh goody. A lens calibration problem in the middle of nowhere.
Luckily Mr Google and Mrs YouTube came to the rescue. The recommendation was to use a proper lens calibration kit such as the Spyder "LensCal".
Hazard a wild guess as to whether there was a shop in Djupivogur which would sell me such a thing. Time to improvise, in other words. I looked around for something which I could use as a focus chart, and the only thing available was a tourist leaflet for the Myvatn Nature Bath (some pictures here) which had crisp text on a white background plus some half-toned pictures. It also had some nice scantily clad ladies on the front cover, but that's not why I chose it. Honest. Next step was to work out how to attach it to the wall so that I could photograph it. No sellotape, blu-tack or the like, so again improvisation was the order of the day. Corn Plasters! You can see one still attached to the back of the leaflet in the second picture below.
Having fixed the leaflet to the wall, I put my camera on a tripod with the offending lens/teleconverter combination, and started the calibration process. This involves turning off IS, engaging mirror-lock and getting the camera to focus on a known point on the target (in my case, the "R" of "NATURE"). It was then a matter of taking a set of shots at different focus calibration settings before processing them to see which gave the best results. To cut a long story short I ended up dialling in +15 units of focus compensation, and the results can be seen below. It might not seem much on the before/after shot, but the difference in normal operation was staggering. Instead of only one shot in ten being sharp, any softness was down to the inadequate focus-following of the Canon 5DmkII or - more usually - operator error!
Sadly the 5DmkII can only remember a single calibration value for each lens combination, so I was only able to calibrate the long end of the 70-200. Since this is what I'd brought the 1.4x converter for, however, it didn't seem too much of a hardship. I know that the 5DmkIII is capable of calibrating both ends of a zoom lens (and, presumably, interpolating between the two extremes). A good reason to buy a 5DmkIII, perhaps?
Here endeth the technical interlude. Normal service on the Iceland Front will be resumed as soon as possible...
Not a great picture of the bird as the eye is in shadow, but the problem is clearly visible. The bird is slightly soft, and the rock about 6-8 inches in front of the bird is bitingly sharp.
Oh goody. A lens calibration problem in the middle of nowhere.
Luckily Mr Google and Mrs YouTube came to the rescue. The recommendation was to use a proper lens calibration kit such as the Spyder "LensCal".
Hazard a wild guess as to whether there was a shop in Djupivogur which would sell me such a thing. Time to improvise, in other words. I looked around for something which I could use as a focus chart, and the only thing available was a tourist leaflet for the Myvatn Nature Bath (some pictures here) which had crisp text on a white background plus some half-toned pictures. It also had some nice scantily clad ladies on the front cover, but that's not why I chose it. Honest. Next step was to work out how to attach it to the wall so that I could photograph it. No sellotape, blu-tack or the like, so again improvisation was the order of the day. Corn Plasters! You can see one still attached to the back of the leaflet in the second picture below.
Having fixed the leaflet to the wall, I put my camera on a tripod with the offending lens/teleconverter combination, and started the calibration process. This involves turning off IS, engaging mirror-lock and getting the camera to focus on a known point on the target (in my case, the "R" of "NATURE"). It was then a matter of taking a set of shots at different focus calibration settings before processing them to see which gave the best results. To cut a long story short I ended up dialling in +15 units of focus compensation, and the results can be seen below. It might not seem much on the before/after shot, but the difference in normal operation was staggering. Instead of only one shot in ten being sharp, any softness was down to the inadequate focus-following of the Canon 5DmkII or - more usually - operator error!
Sadly the 5DmkII can only remember a single calibration value for each lens combination, so I was only able to calibrate the long end of the 70-200. Since this is what I'd brought the 1.4x converter for, however, it didn't seem too much of a hardship. I know that the 5DmkIII is capable of calibrating both ends of a zoom lens (and, presumably, interpolating between the two extremes). A good reason to buy a 5DmkIII, perhaps?
Here endeth the technical interlude. Normal service on the Iceland Front will be resumed as soon as possible...
Labels:
Djupivogur,
Focus Problems,
Iceland,
Lens Calibration
Location:
Djúpivogur, Iceland
Subscribe to:
Posts (Atom)